If you’re setting up a work computer at home, you can use an old router to connect to your internet from anywhere in the house, without needing to run cables. Very useful if it’s a desktop computer that doesn’t have Wi-Fi, or a laptop that has Wi-Fi disabled for security purposes.
What you need
- Old router
- Computer with an ethernet port
- Ethernet cable (AKA, network cable)
- DD-WRT firmware for your old router
What's a Wi-Fi Bridge?
For a bit of background, here’s what we’re trying to achieve.
My niece works for an airline, and because of the corona virus lockdown, needs to work from home. The company gave her a desktop to bring home, which doesn’t have Wi-Fi. Even if it did, a lot of businesses lock you out of Wi-Fi settings so you can’t go connecting to random networks and becoming a security risk.
So this desktop, like many other work devices, can only connect to the internet using an ethernet cable direct to the router.
But the router is at the other side of her house, giving us three options.
Option 1: A long ethernet cable
Run a super long ethernet cable through the house. The problems with this option are:
- We don’t have a super long ethernet cable and would have to buy one.
- Even if we did, it’s inconvenient and a trip hazard having it winding through the house.
Option 2: A powerline adapter
These are great devices, that are able to use the mains wiring in your house as an ethernet cable. You plug one into the wall next to your router and connect it with an ethernet cable.
You plug the other one into the wall next to your computer, and connect that. You now have an ethernet connection between the computer and router.
- Super convenient way to extend a wired connection.
- But they’re pretty expensive.
- Also, we don’t have one, and can’t go shopping for one even if we wanted to (which we don’t).
Option 3: Modify an old router into a wi-fi bridge
Even my dad has an old router lying around, and it’s this we’re using to create a wireless connection between the computer and router.
This is different to just connecting to Wi-Fi (which we can’t do). It’s using a wireless signal to replace the long cable. The modified old router connects to the Wi-Fi signal, and provides an internet connection to the computer using an ethernet cable.
I know this sounds like an ordinary Wi-Fi adaptor, but it’s not. Your computer thinks it’s connected directly to your main router using a cable. An ordinary Wi-Fi adaptor wouldn’t work in this situation, because the computer won’t let you connect to a Wi-Fi signal directly for (good) security reasons.
So we do all this by installing custom firmware on the older router, called DD-WRT.
We’re going to focus on this option.
Step 1: Identify your router
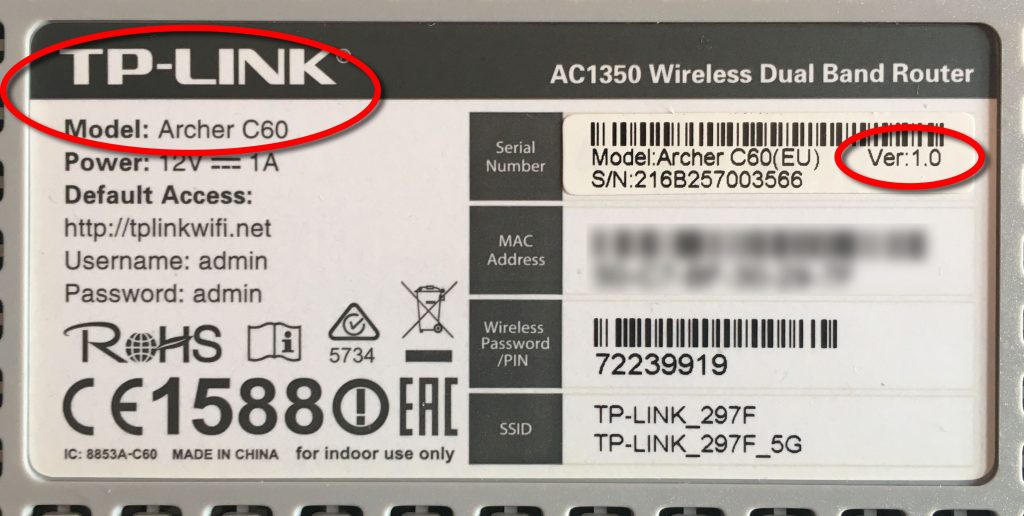
Somewhere on your router (usually on a sticker underneath) it’ll tell you the make and model. But you’re also looking for a version number.
Manufacturers release different versions of the same model over time. The different hardware versions require different versions of the DD-WRT firmware. This is really important.
Step 2: Find your router's custom firmware
“Firmware” is what we call the software that your router runs. Usually this is whatever the manufacturer installs on it, but we’re going to change it so we have extra functions; such as turning the router into a Wi-Fi bridge.
Just to clarify, there is absolutely nothing illegal about doing this, or installing new firmware on any of your own devices. You’ll be voiding the warranty, but your old router’s probably out of warranty anyway. It’s also possible to “brick” your router (so it no longer works), but it’s not that easy to go that wrong.
This custom firmware is called DD-WRT. It’s available for most (though not all) routers, and most hardware versions (again, not all). It has a really helpful, active community who can help a lot with this process, although they are a pretty technical bunch.
You can browse the website to find your custom firmware, and use the convenient router database here: https://dd-wrt.com/support/router-database
A Google search will often be as easy.
Search for your make, model and hardware version along with “DD-WRT“, and you’ll find the info you need.
Step 3: download and install your firmware
I don’t want to seem like I’m skipping important steps, but following the DD-WRT instructions is the best advice. There are so many makes, models and versions of routers that it’s impossible for us to provide specific steps here.
Once you find your device on DD-WRT, it’ll give you all the step-by-step instructions. Just take your time, follow them to the letter, and if you get stuck you can talk to the DD-WRT community (worth registering, now you’re a user), or talk to us and we’ll try to help.
Here are a few generic pointers to help you get an overview of the process.
Connect to your old router
Plug in your router and give it a minute or two to boot up.
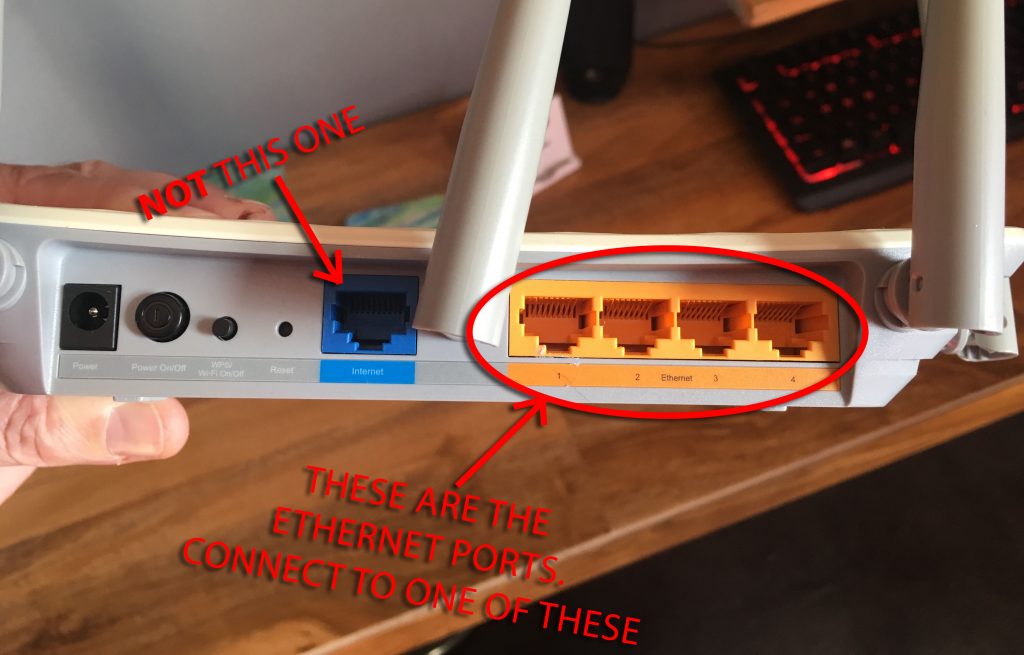
Connect your computer to your router using an ethernet cable. Connect to one of the (usually) four ports on the back. Any is fine, but not the one on its own, labelled “Internet”, or similar.
You won’t damage anything if you do. It just won’t connect.
Note that you won’t have an internet connection. Your computer might also say it’s detected a new network. If it does, it’s okay to tell it that you’ve connected to a “Home” network. That way, the firewall won’t go blocking things.
log in to your old router
Your router has an “IP address”. It’s just like a postal address that computers and devices use to say where exactly they live on your network.
Usually your router’s IP address will be “192.168.0.1“, or maybe “192.168.1.1“. It might say on the sticker on the bottom. If not, Google for “default IP address” with your make and model of router.
Check here, too: http://factorydefaults.com
Open a web browser (like Chrome) on your computer, and enter the router’s IP address in the address bar at the top. If it’s the right IP address, you’ll see a box asking for a username and password.
The sticker on the bottom might also tell you these log in details. It might well be “admin” for both, but not always. Again, if it doesn’t say on the router itself, Google for “default log in credentials” for your make and model.
Check here for default log in credentials, too: https://proprivacy.com/guides/default-router-login-details
Note: This will be different to your old router’s Wi-Fi password. These are two different things.
update your old router's firmware to dd-wrt
Once you’re logged into the router, you’ll see all its options and settings. On one of the settings pages it’ll give you an option to check for new firmware. It uses this to receive firmware updates from the manufacturer.
But it’ll also have an option to upload your own firmware file from the computer. You use this to upload the DD-WRT firmware file you downloaded (probably a .bin file).
Once you upload it to the router, apply the settings and it’ll automatically update to DD-WRT.
Note: Don’t turn the router off, or do anything (to be safe) while it’s updating. It might take a while. Five or ten minutes, sometimes. Just be very, very patient.
When it’s finally finished, you’ll be asked to log in again, and this time the router’s log in page will look a little different, and probably say it’s DD-WRT you’re now logging into.
Now that the router’s running DD-WRT, it’s default IP address is probably 192.168.1.1, even if it was different before. So if you get a blank screen on your web browser, try that new IP address instead.
update your old router's firmware to dd-wrt
Now you’re ready to set up your old router as a “client bridge”. This will connect the old router to your existing Wi-Fi, and share it with any computers plugged into the ethernet ports on the back of the router.
Follow these instructions to set up DD-WRT as a client bridge.
We just installed a fresh version of DD-WRT, so assuming you haven’t made any changes to the settings, you can skip the steps about doing a hard reset.
I know it all seems a bit technical, but it’s not as complicated as it looks. Be bold. You don’t have to understand each step (I certainly don’t) – just go slowly, follow each instruction to the letter, and ask if you get totally stuck.
It worked first time for us, and my niece has now got a solid connection to the internet on her work computer, and it didn’t cost us a penny. Better still, it’s brought some old hardware out of retirement, and upcycled it into something useful, which we love to do at Hudds Repair Cafe.
Remember that, if all else fails, you can re-install DD-WRT to wipe the old router and go back to the beginning to try again.
We’d love to hear how it went for you, so please share here, and on our Facebook page.